Monday, August 26, 2013

Sophia Rose's First Birthday

I posted in July
to let you know I was still alive
and that I lost my camera.
I shared some pins
and promised to show how I used them.
Here you go:

This is
Sophia Rose's First Birthday
back in June.
Ahem.
Don't mind the tardiness
it was bound to happen


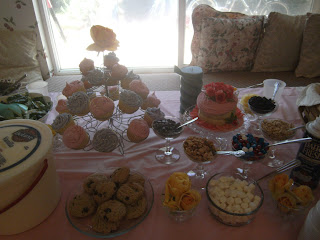
Food, glorious food!

Doily lanterns and store bought ones too!

Daddy and Sophia

Opening presents together.

She was excited about this one.
She actually stood up!

Smiling together!

Cousin Madison had fun too!

Sophia and Madison are only 3 months apart
with Sophia being the youngest.
My girls and Madison
are the only grandkids
and All three of these girls
LOVE to play!!

Do you see the look on Sophie's face?!
Hilarious!
!

The cake and food!
Didn't take much time decorating.
We employed roses from the backyard for that.

Desserts!!
We had cupcakes, ice cream and toppings for ice cream.
It was really really really good!
Next time, I won't even make cupcakes.
They were barely touched
because of all the ice cream and toppings!

Sophie liked the cake!
And stayed relatively clean
=]

Happy birthday my sweet Sophia Rose!
I can't believe a year has gone by already!


Catch up: My Girls

Nothing in particular to report here.
I just wanted to post a few pictures
of my girlies!
So here you go. 


Cheese!

Who hasn't done this with olives!?

Remember I made these shorts?
Finally got a picture!
A happy accident of course!


Sophie likes the box!

It takes Elli 12 seconds to decide
she wants in too!


Playing together! Happy girls!

I love these girls!
Thanks for reading!


Catch up: Collared dress

There's no particular pin I found
that led me to do this.
Maybe it's the idea of using what you have.
I often think of this phrase
as I make clothes for my kids.


So here's what happened.
I was sifting through the girl's clothes
and getting ready to donate some
(when you end up with 8 bins worth of clothes
for ages newborn-2T, it's time to donate!)
As I sifted, I cam across this dress
that seemed a little bit plain.


I was reluctant to part with it
since it was size 4T
and my girl doesn't have that many dresses
she can wear to church.
There's nothing particularly wrong with it.
But there's nothing particularly special either.

Anyway
as I looked at this dress,
deciding it's fate,
I figured out the dress was generally fine
but it wasn't the dress I didn't like.
It was the Collar.

I know collars are BIG now
and EVERYTHING has collars.
I liken them to pockets,
kind of like how everything has pockets now.
It's novelty
and cute
and I like them!
But
This dress didn't look that cute to me.

The collar seemed out of place.
A collar on a dress that's light pink
and springy just took the life right out of it.
Spring Pink dresses should be spun in
and run in
and skipped it!
Who skips when they're wearing a collar?

So
I decided to keep the dress
but that the collar needed to go.
I didn't know where I was going with this dress
or even if the project is "done" yet
because I might do more to it on another day
but here's what I did
and now Elli wears it quite a lot!

Here you go

Get your friend Mister Seam-Ripper.
Yes, I use this a lot so it is my friend!

Collar free!


Stay-stitch the dress back together

Ahh that's better!
Room to breath now!

Here you are my pretty!
Now it's time to play with you!

Collar pieces left over...
What to do with you?

Serge the edges because that's what you're "supposed" to do
Maybe you can be a fluffy, flowy sleeve?
Like a bell sleeves?

Eh, let's try it.
I can always enlist my little friend to rip the seams out


Not bad.
Hey! You're pretty cute!

I might take this dress
and turn it into a cute shirt someday
but today, it's a dress
that has new life given to it!

Thanks for reading!


Catch up: Girls Leggings

I pinned this tutorial
a loooong time ago
from Make-It and Love-It!


It's a great blog btw!
Highly recommend it!
I finally got a chance to use the tutorial.

The tutorial has you make your own pattern
from existing leggings.
To trace the pattern with seam allowances,
I simply taped two pencils together
and traced around the pants with both pencils.
I'm certain I saw this tip on pinterest.
Isn't that where all good ideas come from anyway?

So here's what I did.
I used an old t-shirt for the leggings fabric.
This made them a little shorter
than the original pattern
but they turned out great!
Using a shirt made them comfy
and also made it so the bottom edges
were already hemmed and finished.
Bam!
I love t-shirts
because they are great multi-taskers.
And a well deserved Thanks to Alton Brown
for coining the term "multi-tasker".
I use it all the time.
Who doesn't love Food Network
and more importantly, Good Eats?
But my affection for all things Alton Brown
and Good Eats will have to wait
For another post, another day.

Except for this tiny little story:
When I was in labor with my youngest,
my husband and I were watching Good Eats
and the doctor came in to check on me.
He saw what we were watching
and said he really liked food network
but didn't like Good Eats.
It was too "science-y"
...
I didn't quite understand him
and I almost told him to get out.

Back to the leggings.
Here's the pics.
This pattern was cut on the fold.


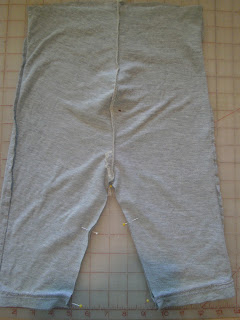
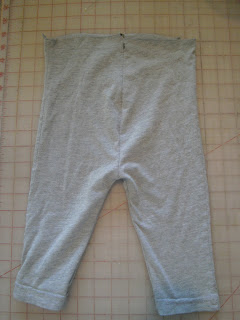
Here's what the pieces looked like
When they are laid out flat
Pin on the curved edges

Sew all the way down the curve


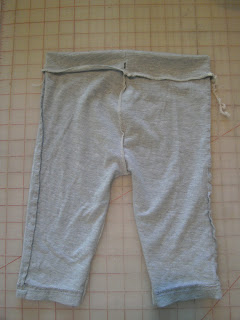
Fold
Sew for Elastic band
Insert elastic.
Safety Pins help this step along
Sew elastic together and close hole.

When I closed the hole, I added a piece of ribbon
to act as a tag so my girl knows
which side is the back.

She likes them already!
So if you haven't made your kid
a pair of leggings,
use the tutorial posted at the beginning
and make 1 or 6
because they are easy
and useful!

We use lots of leggings
for dresses that are too short
but are so loved by my girl
that it would likely cause harmful damage
if put away for good.
It helps extend the life of these dresses!

Thanks for reading!